

Hi, I am Becka (beckarahn) and I have been an Etsy seller since 2005. I am a fiber artist and technology geek. Through the years a lot has changed at Etsy, but having great photos of your work has always been the most important thing for a successful shop. The goal of this series is to show you some common photo problems and give you ideas of how to fix those flaws in just a few steps.
Quick Tip #2: White not Grey
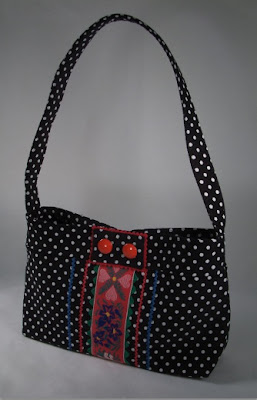
I like to photograph my art against a white background. Sometimes when I don’t have enough light, that background turns out looking grey instead of a nice bright white, and leaves everything looking a little depressing.
The solution for this photo problem is very similar to how we corrected the “golden glow” in the last tutorial.
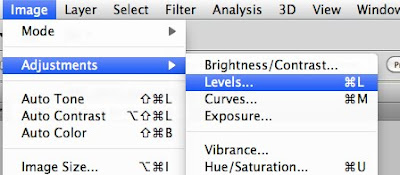
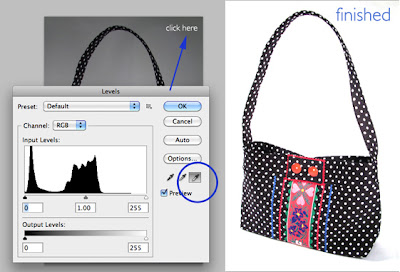
This time, open your image in Photoshop*, go to the “Image” menu, then choose “Adjustments”, then “Levels”. The “Levels” tool works great with photos that are under or over exposed. This sample photo (above) is under exposed and that is why those whites don’t look white.
Find the eyedropper that looks like it is full of white paint. Click on an area in your image that is supposed to be white. Try a couple of different areas on your photo to get the effect you like.
Be sure to save this new corrected photo.
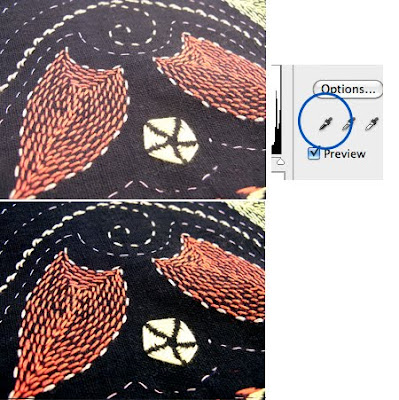
This tip also works with photos that have black that doesn’t look black. This embroidery image below is over exposed so the background looks grey and not black. This time choose the Levels tool and pick the eyedropper that looks like it is full of black paint, then click an area of the photo that is supposed to be black.
 (*The screen shots for this tutorial are from a Mac using Photoshop CS5. Other versions of Photoshop will have the same tool, but the menus might look slightly different.)
What if you don’t have Photoshop? Try looking for a “Brightness” or “Exposure” setting in your favorite photo software (ie Picnik, iPhoto, Picasa, Lightroom). That tool should have a similar effect.
I like to photograph my art against a white background. Sometimes when I don’t have enough light, that background turns out looking grey instead of a nice bright white, and leaves everything looking a little depressing.

The solution for this photo problem is very similar to how we corrected the “golden glow” in the last tutorial.
This time, open your image in Photoshop*, go to the “Image” menu, then choose “Adjustments”, then “Levels”. The “Levels” tool works great with photos that are under or over exposed. This sample photo (above) is under exposed and that is why those whites don’t look white.

Find the eyedropper that looks like it is full of white paint. Click on an area in your image that is supposed to be white. Try a couple of different areas on your photo to get the effect you like.

Be sure to save this new corrected photo.
This tip also works with photos that have black that doesn’t look black. This embroidery image below is over exposed so the background looks grey and not black. This time choose the Levels tool and pick the eyedropper that looks like it is full of black paint, then click an area of the photo that is supposed to be black.
 (*The screen shots for this tutorial are from a Mac using Photoshop CS5. Other versions of Photoshop will have the same tool, but the menus might look slightly different.)
What if you don’t have Photoshop? Try looking for a “Brightness” or “Exposure” setting in your favorite photo software (ie Picnik, iPhoto, Picasa, Lightroom). That tool should have a similar effect.
7 comments:
What about setting white balance before you take the picture? Wouldn't that also solve the problem?
Thanks for the tip, especially getting black to look black.
Absolutely, Jacqueline! You can set the white balance on your camera first if you know that the picture is going to come out too dark. This is a way to fix it if you don't think about that ahead of time. When I took this picture it looked like it was much brighter than it turned out.
Thanks a ton! I use Gimp, but it worked pretty much the same way.
Thank you, Becka. Appreciate the excellent examples and simplified instructions :)
Another great tip! I've been practicing that and it's wonderful cleaning up that gray look! I do have too many pics like that. My camera has manual white balance fix, but I can't get it to work. :(
Keep 'em coming!!! These are so simple anyone can do them.
Oh boy. I've been such a moron. I've been trying to erase or paint around the edges of my items to get the nice white background but, of course, this makes them look rather odd sometimes. I can't believe there is such a simple fix for this. Thank you!
Post a Comment