Showing posts with label photography. Show all posts

Wednesday, September 26, 2012

Words of Wisdom Series: What Camera Do I get?

Raspberry Necklace by inedible jewelry

In this series, we ask the SASsy Mentors for their "words of wisdom" about a specific topic.  This month, we asked Emma from benconservato, Jenny from thepaintedlily, Lauren of sugartreecreek, Ilze of ilzesmemories, Jessica of inediblejewelry and Becka of beckarahn this question:   
What camera do you have and what is the best/worst feature about it?

Our panel was in agreement on several recommendations:
  • New or old doesn't matter.  What is important is knowing your camera and learning how it works to get the results you want.
  • Manual settings including the ability to select ISO, adjust white balance, shutter speed and aperture give you lots more flexibility for different lighting situations.
  • Sometimes it is more about the light than the camera.  Making sure that you have bright, even illumination is going to help your photos look great.  Many recommend using natural light, but you can also get great results by using other light sources combined with the right camera settings.
Canon
Becka, Emma and Jenny are all fans of the Canon Powershot G Series, both older and newer models. (Becka has a G9 and G12, Emma has the G10.) The color/white balance is great.  The PowerShots have lots of settings you can adjust (ISO, white balance) and many features (that you usually only find in a DSLR) in a point-and-shoot style body.  Macro mode is excellent.  The G12 model has auto-detect for macro shots so you don't need to switch the modes back and forth.

Jenny's tip: It's nice to be able to have a smaller camera sometimes to shoot things when I only have one hand available. I model my own rings for the shop and it's great to have a nice, light camera to shoot those with.

Lauren recommends the Canon Rebel 3i and Canon 5D but has this to say about getting a DSLR:  I use a Canon 5D, because I am also a professional photographer. I set it on manual, meter the light and use the macro lens. But don't think you need an expensive camera for a good picture of your craft. These cameras have lots of settings which means lots of knowledge about your camera.

Panasonic
Panasonic DMC-TZ3 Lumix with the Leica lens.  Emma says:  It has good and bad points. Sometimes it adjusts the light in a way you don't want it to - it looks fine on the screen, and the shot is then dark or blue in tint or very yellow... annoying. I usually have to slightly adjust the photos in PhotoShop anyway. I am not the only person I have spoken to who has light issues with this camera.

Nikon
Jenny says: I currently use a Nikon D80 that I've had for a few years. I love that it's easy to shoot with and that it works so well with natural light. I shoot on a tripod with side light from a window and I never use a flash. I shoot on my macro setting to be able to get great details and super close ups. 

Ilze says: I shoot with Nikon D300 for 3 years now, and I really love it. There have been few generations that already have followed with improved and added features, but my D300 has great shutter speed, minimal noise, and variety of lenses available. I use it in my photography business as well as my etsy business.

Olympus
Jessica says: I use a 12 year old Olympus; I'm not sure of the model. It was a decent, mid to high end camera ...in the late 90s. I am looking to upgrade, primarily because I've reached the technical limits of my camera and the photos need to be more high-res in the future.  My favorite aspect of the camera (and a feature I can't recommend strongly enough!) is that it's super easy to manually set the white balance. I just snap a photo of a piece of white card stock, then hit a button to let my camera know that's white in my current light condition. My camera then automatically corrects for my lighting, which means my colors come out very true to life.

Monday, August 27, 2012

Polish Your Photos Series: Quick Tip #5 Know When to Say No

Another great photography skill you can learn is knowing when to just throw away a photo and move on. So often I hear people say "I will just Photoshop it," with the confidence that Photoshop can fix every problem.  Sometimes that just isn't the case.

Here are some examples of "No Photoshop Fix" photos, with ideas of what you might do when you re-shoot the photo to correct the problem.

Problem 1: Focus
There is no amount of sharpening that can fix something that is blurry.  Even if your photo looks ok as a thumbnail, when the customer clicks and it is one big blur, that is probably not going to result in a sale.  For the top photo, there is great sharp focus in the center and blur around the edges.  This is your camera creating a tiny depth of field.  Sometimes it can be an amazing artistic effect (think macro shots of a single flower bud with a soft fuzzy background), but not always what you are going for. 

Problem 1 Re-Shoot Fixes:
For the top photo, the way to get everything sharp and in focus is to add more light.  Adding a brighter lamp or waiting for a sunnier day will get more light in the camera, increase the depth of field and make everything in focus.

For the bottom photo, the easiest fix is probably to turn on the camera's macro mode.  This ball of yarn is so close to the camera that it is having trouble finding the focus.  Macro mode (tulip icon) will help the camera focus really close and get a great detail of the yarn.


Problem 2: Over Exposed and Under Exposed
These are also two related but opposite problems.  In the top photo, there is a big reflection (too much light) on the glass and in the bottom, the whole photo is really dark.  You can do a little Photoshopping on these, but the problem is that in the very brightest brights and darkest darks, the camera didn't capture all of the data.  It just saw that big white blob as 100% white and not as 100 shades of something else.  So there are no colors left to tweak and try to adjust, just white.

Problem 2 Re-Shoot Fixes:
For the top overexposed photo, the key is to make that reflection go away.  A light box to soften and diffuse the bright glare might help.  Sometimes positioning yourself at a different angle will let you not see a reflection.  You can also try using a bright white piece of paper to reflect light back at your piece instead of pointing a lamp right at it.  Point the lamp at the paper instead.

For the underexposed photo, adding more light is going to be a big help.  If you have some manual settings on your camera, it will also help to open up the aperture to allow more light in.  Aperture is adjusted by choosing a smaller f-stop.   (Smaller numbers = more light)  Want to learn more?  Read this article.


Problem 3: Too Many Light Sources
Believe it or not, the photo above is a yellow ball of thread on a white background.  The background has acquired a lovely gradient caused by the light sources I used to take the photo: a very yellow tinted incandescent lamp (top right) and a blue tinted light from the kitchen window (lower left).

Problem 3 Re-shoot Fixes:
One or the other of these color shifts is pretty easy to fix (see this article), but fixing both problems in the same photo is really difficult to keep your item looking the color it is supposed to be.  The solution is to try to use one kind of light source.  Switch to all lamps/lights (make sure they all have the same kind of bulbs), find a brighter window or take it outside.


What are your photo problems? 
Please add your questions in the comments and we will try to address them in future blog posts!
-- Becka, SASsy Team Co-Captain

Wednesday, May 2, 2012

Polish Your Photos Series: Quick Tip #4 Macro Mode

Sometimes the way to fix your photos isn't with Photoshop, but the trick is to change a setting on your camera so that it is taking the right kinds of photos.  It is really important to have close up detail images of the work that you are trying to sell in your Etsy shop.  I often see that those close up shots are blurry and completely out of focus, but that can be easy to fix!

Take a look at the buttons on the back of your camera and see if you can find a picture of a tulip.
This tulip is the icon for "Macro Mode".  When I push that button on my camera, it lets me switch between regular and macro mode.

Try switching modes and taking your close up photos in "macro mode".  Macro mode tells the camera that you are trying to take a close up shot of something and it re-adjusts the way it focuses.  Here are a couple of examples.  These are basically exactly the same photo (same lighting, same distance, same camera settings) except one is in regular mode (left) and one is set to macro mode (right).  (Oops!  You can even see the dog hair in macro mode.)

Not every camera is going to have a macro mode, but it is a very common feature.  Sometimes you will find the tulip icon on a button or dial on the back or top of the camera.  Sometimes you might need to dig through the menus to find it.  If in doubt, check your owners manual.


After a brief hiatus, the Polish your Photos Series is back! Click here to see the rest of the series.  About the author: Becka is a geek for fiber art and technology.  She is the co-Captain of the SASsy mentors team.

Tuesday, September 27, 2011

Polish your Photos Series: Quick Tips to Make them Shine


Hi, I am Becka (beckarahn) and I have been an Etsy seller since 2005. I am a fiber artist and technology geek. Through the years a lot has changed at Etsy, but having great photos of your work has always been the most important thing for a successful shop. The goal of this series is to show you some common photo problems and give you ideas of how to fix those flaws in just a few steps.


Quick Tip #3: Tiny Retouching
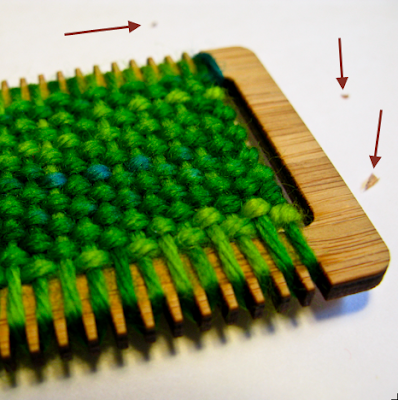
Here's another photo scenario that happens to me once in a while. I set everything up, I took a whole bunch of great shots, the light was good and what's that? There's dust and fuzz in my photo. How did I not see that?


Sure, it's not the end of the world, but it does make your photos look less than fabulous and it might turn off a potential buyer. It is pretty easy to remove a few tiny blemishes without having to re-shoot your photo. This tip should work for tiny problems like dust, stray threads, a wrinkle or flaw in your background.

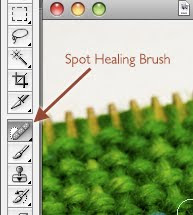
In Photoshop, the tool you are looking for this time is called the "spot healing brush". It looks like a bandaid in the tool palette.


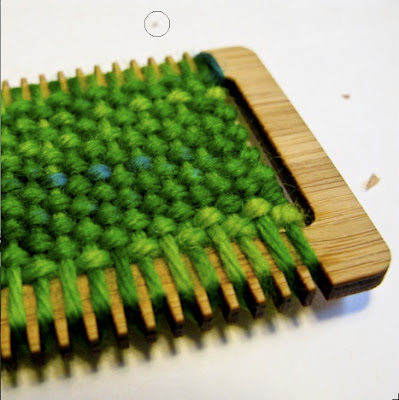
Your cursor will change to a tool that looks like an open circle. You can adjust the size of that "brush" with some options that will pop up at the top of the screen. Here's how mine is set (click the image to see it larger.)

Place the circle cursor over your dust spot and click. It will briefly darken that area and then it should make the dust spot disappear. You can also "paint" with the spot healing brush if you have something larger than a tiny spot (like a dog hair) by clicking and dragging it. Here's "before":

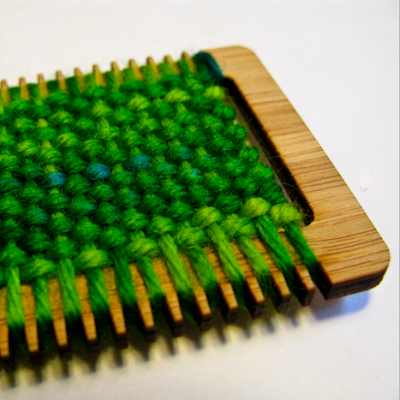
Here's the "after". Be sure to save this new corrected photo.
This tool is going to work best for tiny corrections. Remember, you don't want to spend 30 minutes working on your photo in Photoshop when it could be quicker to just shoot another photo.

(*The screen shots for this tutorial are from a Mac using Photoshop CS3. Other versions of Photoshop will have the same tool, but the menus might look slightly different.)

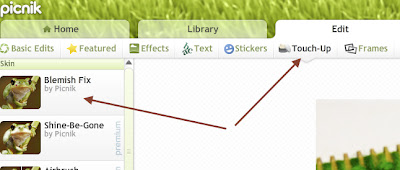
What if you don’t have Photoshop? Once again, look for a tool using your favorite software that is called "Spot Remover" or "Retouch" or "Blemish Fix". Here's what it looks like using Picnik:

Saturday, January 1, 2011

How to use a light box and photo editing software to make beautiful photographs

Written by TheHouseofMouse

Great photos are one of the most important things to get right if you sell online. Your photographs are your virtual shop window: If they are not light, bright and eye-catching then often buyers will surf right past your store without even noticing your work. Really beautiful photographs will bring buyers through your virtual door and keep them there long enough to remember your creations.

These photography tips are designed to help you make your photographs looks bright, eye catching and professional and you don't need to have an expensive camera to do this!

This tutorial comes in two parts:
  1. How to make a Light Box
  2. How to edit your photos to make them pop
I use both processes for all of my photographs.

Part 1: How to make a Light Box
These tips are one way of taking great photos, but they are certainly not the only way. I hope that you will be able to use this tutorial as a starting point and gain the confidence to make photographs with your own style.

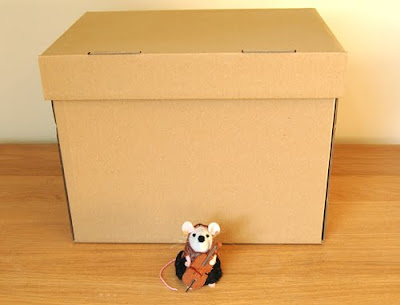
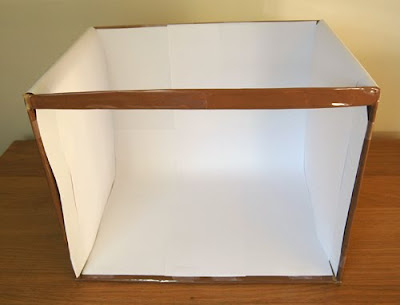
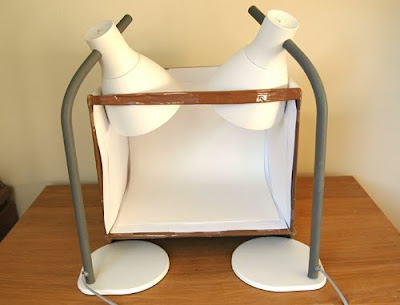
First select a box that is the right size for what you want to photograph. For small items like jewelery a box about 30cm wide or 1 foot is good, although if you want to photograph larger items you will need a larger box.


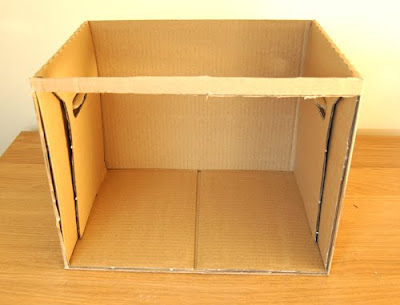
Cut out the top of the box and the front, leaving a bar across the top to help your box keep it's shape


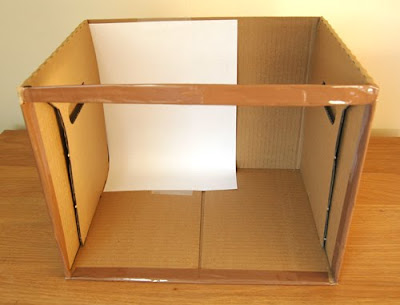
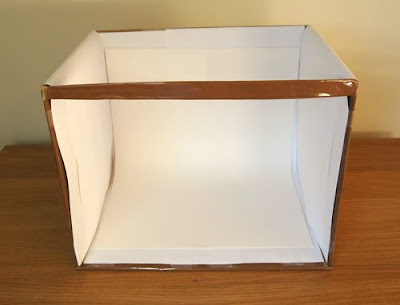
Line your box with white paper, making a curve with paper in the back horizontal corner so that it won't show up in your background.


Make sure you put white paper on the sides too, this will help to bounce the light around even more and make your photographs really bright.


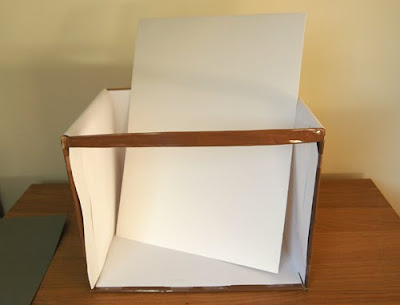
To avoid any lines in your photographs, use a large piece of paper for your backdrop, I love to have a white background so I am using a piece of A3 white card, but you can use any color you like. You can also use fabric if you prefer.


Stick or pin your background in place,
again making a curve in the horizontal corner.


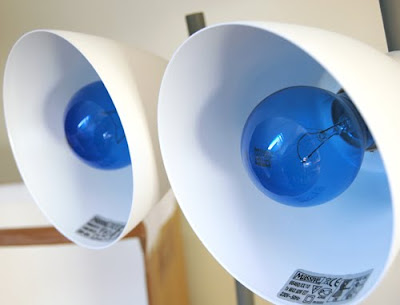
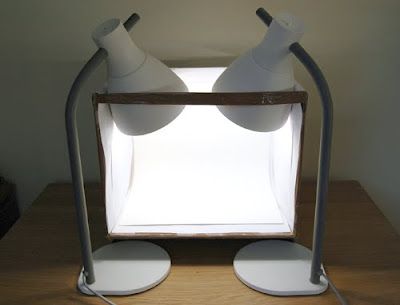
Your light source should be 2 adjustable lamps with daylight light bulbs, 100watts will get a great result. Daylight light bulbs are best because the colors in your photographs will be more accurate than if you use a regular yellowish bulb. Daylight light bulbs look bluish when they are not on. You can get daylight light bulbs from any good electrical store, some art supply stores also stock them as painters prefer to use them too.


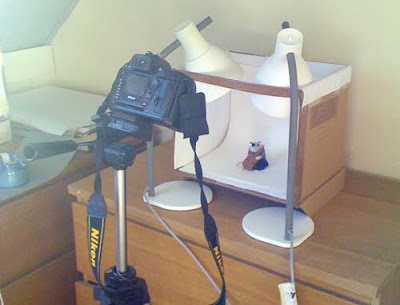
Arrange your lamps on either side of your light box, if the stands poke under your box -as they do in mine - then stand your box on some books to make it flat. Some people prefer to just use one lamp, but I find using 2 will eliminate all shadows and shows up the details on your work much better.


As you can see, when the bulbs are on the light bounces around in the box in all directions! Perfect for taking bright photographs


If you have a tripod for your camera then set it up in front of your light box, if you don't have a tripod then add one to your christmas list! For now you can stand your camera on something to balance it.

The reason for the tripod is that you don't want to be using the flash on your camera. If you turn off the flash on some cameras then any photographs taken with the camera in your hands will look shaky, the tripod will keep it stable and make your photos nice and clear.

Finally your light box is ready! Place your items in your light box, switch on your lamps, arrange your camera (remember to switch off your flash) and take some photographs!

Every camera is different, some of you may find that you are happy with the photos you get just from the light box. But if you are like me you will still want to make them brighter. Part 2 explains how to do this...

Part 2: How to edit your photos to make them pop
So you have your photos from your light box, but they are still a little dark and dreary. This tutorial will show you how to edit your photos to brighten them up and make them really pop!

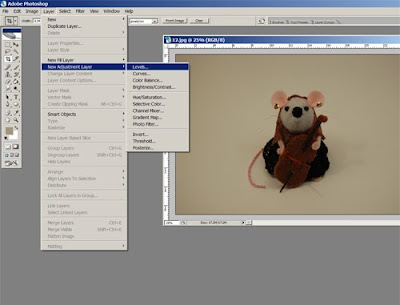
To do this you will be using the "levels" tool that is found in almost every photo editing software. I will be using Photoshop for this tutorial. If you don't have any photo editing software then I recommend you try picnic which is a free and simple photo editing site (to get to the levels tool on picnic: upload a photo, then click "exposure" and then "advanced").

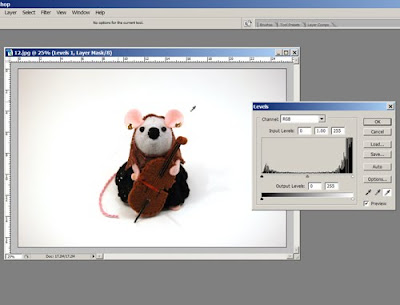
To open the levels tool in Photoshop, click the "layer" menu then "new adjustment layer" and select "levels", then click "ok" to open the tool.


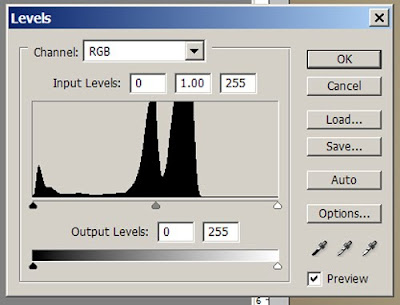
The levels tool looks like a graph or histogram. By using the dropper feature and sliding the arrows around you can create different effects, including lightening up your photographs.

Use the dropper feature to select the lightest color in your photograph. (The dropper does not appear on the picnic website, but it will appear in Photoshop and a few other photo editing programs.)

The dropper is the 3 little icons in the bottom right corner of the levels too. You can use these to select the darkest, lightest and medium tones from your photograph. For my purposes I only want to use the lightest one (on the far right) but feel free to play around with them to see the affects you can get.


Select the white dropper and then click it on the lightest part of your photograph. You can keep choosing a new part until you are happy with the result. As you can see, I have selected the brightest area of my background. This will automatically readjust the photograph.

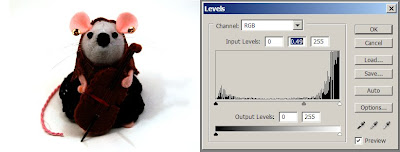
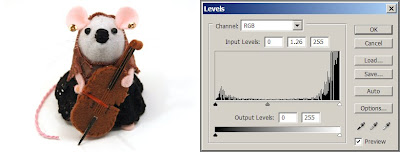
Next you can also use the arrows on the slider under your histogram to lighten or darken your photograph further. If you are using picnic then this will be your main way to lighten your photographs. Click the arrow in the middle of your histogram and slide it to the left and right to see the results

Slide it to the left to lighten your photograph


Or slide it to the right to make it darker


I just want to lighten my photograph slightly so that you can pick out the details in the Cellist Mouse's skirt. When you are happy with your adjustments click "ok"


If you are using Photoshop, you will need to "flatten" your image before you can save your document as a .jpg . To do this select the "layer" menu and click "flatten image" you are now free to save your file. Feel free to crop your image if you want to before you save.

Here is what my photograph looks like before and after using Photoshop to brighten it up...


Written by TheHouseofMouse


Tuesday, June 15, 2010

Stop saying you don't have a live model...

written by blythehopesvintage.etsy.com

You do. Yourself.

If you really want to show off your creations on a model, it may be time to put on your big girl panties and learn how to use the self timer on your camera.

Yeah yeah, I hear a cry of 'But I look terrible in pictures!'

Very likely you do - and that's because modeling is actually a skill, not a gift of genetics. Okay, it helps if you look like Kate Moss, but it isn't necessary in order to take a good shot of what you're selling. But I can assure you that even our dear Kate had to LEARN how to take a good picture. Just like how you learn to use your camera, you need to learn how to model.

They have classes at the big agencies for just this purpose. I used to teach one.

So here are some basic things you can master:

1) Nerves - nothing looks worse in a photo than nerves. One way I beat this is reminding myself that it's not about me, it's about the product. No one is coming into my shop to see how ugly/skinny/ridiculous I look, they're coming to see the clothes. Therefore I need to do my job to show off the clothes in the best way.

2) Angles - Y'know how we're always told never to shoot our product straight on and centre? Same with a person. Limbs bend in many different ways - use them.

3) Hands: One major thing that people have trouble with is their hands - usually the more you think about relaxing them the tenser they get, so try bending your middle fingers slightly - your hands will instantly relax and look natural.

4) Think about negative space - if your arms are straight down the sides of your body, you now look as wide as your body plus two arms. Do you want to look wider? Yeah, didn't think so. Aim to separate your arms from your body a little bit so your figure is visible. For example:


One arm is by my side, but held slightly away so there's space between my waist and my arm, the other is on my hip. Another point is not the break the 'line' of the outfit - always place your hand under the waist line slightly - not on it.

5) The most flattering pose is going to be one that makes your body look longer - there's a reason most models are very tall, clothes look better in photos on a long body type. However, if you're titch like me you can cheat. Check out my dear friend Alex in this picture:


See how her body makes an 'S' almost? I swear this looks good on everyone, the trick is to put all your weight on one foot and rest just the toes of the other on the floor, and move your shoulders off to the side without the weight.

6) Facial expression - forget the camera is there and think about something or someone nice - run a little day dream in your mind while the camera clicks. Looking off to one side is always gonna be more flattering than straight on:


7) Most importantly, learn to be self critical. That doesn't mean focusing on all the things you don't like about yourself - we all have issues with the way we look, but I promise no one is looking at your nose. Look at the picture as a whole, and decide if it's showing the PRODUCT to it's best advantage. Take lots of photos, you can always delete them.

written by blythehopesvintage.etsy.com


Sunday, September 13, 2009

My Photo Saga

Written by beckykazana

You've heard it over and over again: One of the greatest challenges to selling products on the web is good photography. Despite a few college photography classes (we were probably the last in history to learn on regular SLRs!) I have struggled long and hard with getting good shots, particularly of my pipe cleaner gals. They are a quirky product and I knew that they needed the right kind of photos to showcase their particular little personalities, but I was continually frustrated. I wanted to share my saga with you, because I really do believe that I've finally had a breakthrough.

I'm going to skip my efforts with my pocket sized Cannon. It was a great little camera for travel, but I had no control of the zoom function and images of these small objects were often blurry or focused on the wrong parts.

The shot above was taken sometime in November with my new Nikon D40 . This is a complicated piece of equipment, but the image quality was noticeably better, even with the camera hand held on auto. Christmas is obviously a good time of year for ornaments like these and I wanted to set the mood properly, but a lot of the detail and color is lost.

A later effort where I tried to take advantage of the lovely diffused light that enters our apartment in the late afternoon. Though you can actually see the gal better this way, the details in the background are still distracting.

My next brainwave was an outdoor photo shoot with the incredible blooming rosemary bushes dotting our apartment complex serving as a backdrop. I thought it might give that garden fairy ambiance I was looking for. Instead, the direct light cast harsh shadows and gave an amateurish backyard feel that I hated.


I had tried using a light box with mixed success while we were in China. Eric helped me rig up a rickety approximation and we clamped the lights directly to the sides, which had the same effect as the outdoor lighting; garish shadows and washed out color.

This time he constructed me something really marvelous. He cut out panels in an ordinary cardboard box, hot glued white fabric to these windows to diffuse the light, bought some halogen work lights (oi! Do those suckers get hot!) and also invested in a tripod for my fancy new Nikkon. (Thanks for all that hard work Mister!)


These shots are an improvement, but I was still disappointed with the contrast and detail. I had to start playing with the settings and reading the darn manual- a recipe for a big headache, but also the key to success. It is important to me not to have to fiddle with photo-shopping my Etsy listing images- to do that with five images for every single listing at the volume I have in my inventory makes me absolutely cringe. I just can't do it. So I wanted to get good shots on the first try. My next thought was to switch to a colored backdrop, adjust the f-stop and exposure time.

After reading this post, I decided to take the plunge and bought a few sheets of colored Canson paper at vile Michael's, adjusted my light meter and went through lots of trial and error, but I think I've finally arrived at a winner here. There is no distracting background, good contrast without any fiddling around in Photoshop, bright vibrant color that sets the playful tone and looks great in thumbnails. I'm a very happy camper. I know I still have a lot to learn about my new camera and photographing for the internet, but the flush of success feels good after all this time!


Here are a few of the other new shots just for fun. It's made a great difference in the look and feel of my shop. Any suggestions out there from others doing product photography? I'm all ears!